If a shop vac does not start automatically when you turn on a power tool, first check the vacuum’s operating mode, tool connection, and power limits. Then inspect the filter, hose, seals, drum, and electrical components in that order.
What do you need help with?
Open an answer, or tell us what we should cover next.
Answered in this guide
Fix a shop vac that will not auto-start with a power tool
Set the vacuum to Auto, check the tool and power connections, test another compatible tool, inspect airflow and setup, reset the unit, and consider a failed outlet or switch if Auto mode still does not work.
Check whether the tool or power connection is causing the problem
Unplug both devices, then inspect plugs, cords, contacts, scorch marks, and power strips. Test the power tool itself and try another compatible corded tool to see whether the vacuum or tool is at fault.
Restore airflow when the shop vac seems ineffective
Inspect the filter, hose, inlet, adapter, seals, and drum or bag for clogs, leaks, or incorrect setup. Restricted airflow may reduce suction or trigger overheating even after the vacuum motor starts.
Know when to replace a shop vac part or the vacuum
Replace a filter, hose, gasket, or adapter when the vacuum still runs normally but has an airflow or fit problem. Consider the switch, control assembly, or entire vacuum when the auto-start circuit remains defective.
Request a topic and help us choose what to build next.
Choose between a dust extractor and a shop vac
Check whether a circuit can handle a shop vac and power tool
Replace or repair a failed auto-start switch safely
Compare a tool-triggered shop vac with a regular switchRead this guide →
Requests help us prioritize the next guide. No email required.
One anonymous request per topic.
Shop vac auto-start not working with a power tool
If your shop vac does not turn on when you start a connected power tool, the most common causes are an incorrect switch setting, a poor power connection, an incompatible tool load, or a problem with the vacuum’s controlled outlet. Unplug the vacuum and tool before inspecting connections, and follow the manufacturer’s instructions for the specific model.
1. Confirm the shop vac is in automatic mode
Many shop vacuums have a switch with separate On, Off, and Auto settings. The auto-start outlet usually works only when the switch is set to Auto.
Check these points:
Set the vacuum to Auto, not Off or continuous On.
Make sure the power cord is plugged into a working wall outlet.
Confirm the tool is plugged into the vacuum’s tool-controlled outlet, not directly into the wall.
Turn the tool on after making the connections.
If the vacuum has a delay after the tool stops, wait briefly before assuming it has failed.
Some vacuums require the power tool to draw a minimum amount of current before the motor starts. A low-power tool, battery charger, light, or electronic device may not trigger the automatic switch reliably.
2. Check the tool and power connections
Unplug both devices before checking the cord and plugs. Look for loose plugs, damaged insulation, bent contacts, scorch marks, or a power strip that has switched off.
Then try this controlled check:
Plug the vacuum directly into a known-good wall outlet.
Set the vacuum to Auto.
Plug a compatible corded power tool directly into the vacuum’s controlled outlet.
Turn the tool on briefly.
Do not exceed the vacuum’s outlet rating. The allowed tool load varies by model and may be printed near the outlet, on the rating label, or in the manual. Do not connect a power strip, extension cord, or multiple tools unless the manufacturer specifically permits it.
A battery-powered tool will not activate the vacuum through the outlet because it does not draw power from that outlet. A corded tool with electronic speed control, soft start, or very low power consumption may also fail to provide a detectable load on some auto-start circuits.
Product prices and availability are accurate as of the date/time indicated and are subject to change. Any price and availability information displayed on Amazon.com at the time of purchase will apply to the purchase of this product.
3. Test whether the power tool itself is the problem
If possible, try a different compatible corded tool with a known working cord. If the vacuum starts with the second tool, the first tool may have a damaged cord, switch, plug, or electronic control that the auto-start circuit cannot detect.
If neither tool activates the vacuum, plug the original tool into a wall outlet briefly to confirm that the tool runs. Keep the vacuum disconnected from the tool during this test. Stop using any tool with a damaged cord, plug, unusual noise, burning odor, or visible arcing.
Product prices and availability are accurate as of the date/time indicated and are subject to change. Any price and availability information displayed on Amazon.com at the time of purchase will apply to the purchase of this product.
4. Inspect the filter and airflow path
A clogged filter usually reduces suction rather than directly disabling auto-start, but restricted airflow can make the vacuum appear faulty and may cause overheating or protective shutdowns.
With the vacuum unplugged:
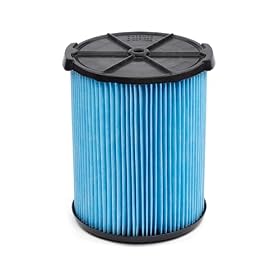
Remove and inspect the filter.
Clean or replace it according to the manual.
Make sure the filter is the correct type for wet or dry pickup.
Check for heavy dust buildup around the filter cage and intake.
Never operate the vacuum without the required filter.
Do not wash a filter unless the manufacturer identifies it as washable. A damp or incorrectly installed filter can damage the vacuum or restrict airflow.
Product prices and availability are accurate as of the date/time indicated and are subject to change. Any price and availability information displayed on Amazon.com at the time of purchase will apply to the purchase of this product.
5. Check the hose, inlet, and tool adapter
A blocked hose will not usually stop the auto-start outlet from sensing a tool, but it can make the system seem ineffective once the motor runs. Check the entire path:
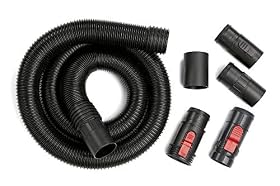
Remove the hose from the vacuum and tool.
Look through the hose for packed dust, screws, wood chips, or wet debris.
Check the vacuum inlet and tool dust port.
Inspect the adapter for a loose fit or collapsed section.
Make sure the hose is not sharply kinked.
Use an adapter that fits both the vacuum hose and the tool’s dust port. An improvised connection may leak air, detach during use, or allow debris to enter the wrong part of the tool.
6. Look for air leaks and incorrect setup
A loose hose connection or missing gasket can reduce collection performance. Inspect the hose cuffs, inlet fitting, lid seal, and tool adapter for gaps or damage.
Also confirm that:
The lid is seated evenly on the drum.
Latches are fully closed.
Any intake cover or accessory port cap is installed correctly.
The hose is connected to the correct inlet.
The vacuum is not configured for a wet-pickup setup when dry dust collection is required.
Air leaks do not normally cause an auto-start outlet to stop sensing the tool, but they can lead to weak collection and may be mistaken for a start-up problem.
7. Empty the drum or replace the bag
A full drum, full collection bag, or activated float shutoff can restrict airflow. Unplug the vacuum, remove the lid, and check the collection container.
Empty the drum before debris reaches the maximum fill level. If the vacuum uses a disposable bag, replace it when full or clogged. For wet pickup, check whether the float has risen and blocked the inlet. Never continue operating the vacuum if liquid has reached electrical components or the motor area.
8. Reset the vacuum and check for overheating
If the vacuum ran recently and then stopped responding, let it cool completely. Some units have thermal protection that interrupts operation after overheating or restricted airflow.
After cooling:
Disconnect the power tool.
Unplug the vacuum for several minutes.
Clear the filter, hose, and inlet.
Empty the drum if necessary.
Reconnect the vacuum and test Auto mode with a compatible corded tool.
If the vacuum runs in continuous On mode but not in Auto mode, the fault is likely in the sensing circuit, controlled outlet, switch, or related wiring rather than the motor itself.
9. When the auto-start outlet or switch may have failed
The auto-start circuit may be defective if:
The vacuum works in continuous On mode but never in Auto mode.
Several compatible corded tools fail to trigger it.
The controlled outlet is loose, discolored, cracked, or shows scorch marks.
The switch feels broken or does not stay in position.
The vacuum trips a breaker, blows a fuse, smells hot, or makes buzzing or arcing sounds.
Do not open the vacuum or bypass the auto-start circuit unless you are qualified to repair electrical equipment and the manufacturer permits service. Unplug the unit and contact the manufacturer or a qualified repair technician. If the controlled outlet or internal switch is damaged, replacement may be safer and more economical than continued troubleshooting—especially on an older vacuum.
When to replace a part or the vacuum
A replacement filter, hose, gasket, or tool adapter is reasonable when the vacuum still operates normally and the problem is limited to airflow or fit.
Consider a replacement switch or control assembly only when the exact part is available for the vacuum and installation can be performed safely. If the motor, wiring, circuit board, or outlet has failed—and repair cost, parts availability, or safety is uncertain—replacing the vacuum may be the better option.
Until the problem is resolved, operate the vacuum manually only if it functions safely and the manufacturer allows that mode. Do not leave a manually switched vacuum running unattended with a power tool.
Why does my shop vac work manually but not start automatically?
The vacuum may be in the wrong switch position, the tool may be plugged into the wrong outlet, or the auto-start sensing circuit may not detect the tool’s electrical load. Test Auto mode with a compatible corded tool and a direct wall connection. If several tools fail while continuous On works, the sensing circuit or switch may need service.
Can a battery-powered tool trigger a shop vac auto-start outlet?
Usually not. The tool-controlled outlet generally detects the electrical load of a corded tool plugged into it. A battery-powered tool does not draw power through that outlet.
Why does my shop vac start with one power tool but not another?
The tools may have different power draws or electronic controls. Some low-power, soft-start, or speed-controlled tools may not provide the load needed to trigger a particular auto-start circuit. Check the vacuum’s manual and outlet rating.
Is it safe to bypass a broken shop vac auto-start switch?
Do not bypass or modify the circuit. Use the vacuum only in a manufacturer-approved manual mode if it remains safe, or have the unit inspected by a qualified technician. Stop using it if there is heat, burning odor, arcing, damaged wiring, or breaker tripping.